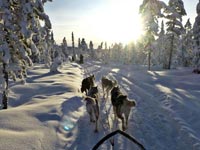
All our dog sledding tours in Sweden, Norway and Finland are based on adult participants driving their own dogsled with team of huskies.
It’s quite common to be a little unsure when you begin, but you’ll soon gain confidence. After a few days on the trail, you will be well on the way to becoming a real musher!
Many of the ways in which you will need to use your body to work with the sled and your team of huskies will come naturally. To help you prepare, here we outline the basics of driving a dogsled and handling your team.
Your guide will also give instruction at the start of the tour before you begin. Of course, you can always ask for hints and tips as you go along!
Harnessing your dogsled team:
Your guide will have selected dogs for your team to suit you and the type/length of tour you will be doing.
Factors to consider may include:
- the size/strength/number of dogs relative to your bodyweight
- the weight to be carried in the sled
- which dogs work well in particular positions (such as lead dogs or wheel dogs) or get on well together
- if a particular female dog is in heat and needs to be kept separate.
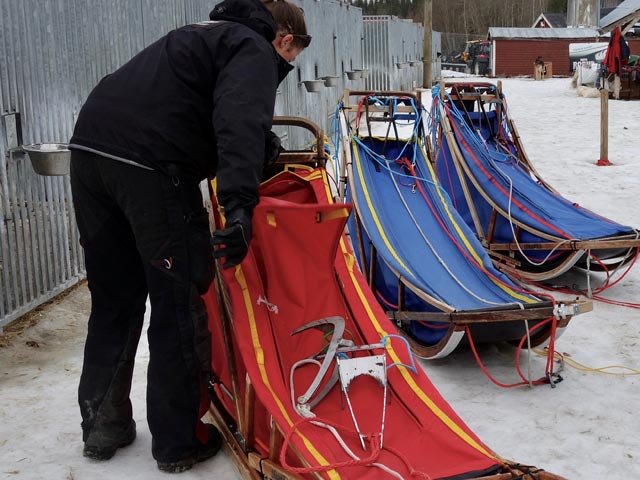
Preparing the sled:
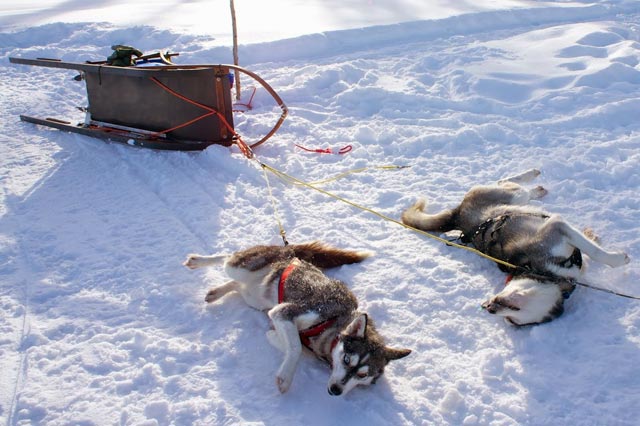
You will begin by laying out the sled lines in front of the sled. Often you will stake out the front line into the snow to keep the team in line once harnessed. The sled itself will have the anchor down and may also be secured to a tree or post with a quick-release knot.
Then you harness your dogs one by one – your guide will let you know the recommended order for this.
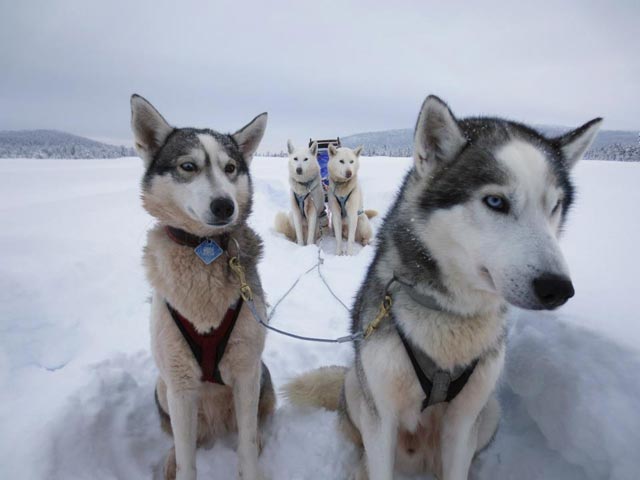
Which dogs go where?
Dogs nearest the sled are called “wheel” dogs. These are often the largest, strongest dogs, usually males.
In the middle (if you are running a team of 5-6 dogs) come the “team” dogs, who are the steady workers of the team.
At the front come the “lead” dogs, often female and smaller, and normally the most intelligent dogs in the team.
You will harness your dogs in pairs, one on each side of the central line (if you have an even number of dogs in your team). Your guide will show you how to fit the harnesses. The dog’s front legs go through two holes in the harness. The head goes through the third hole, and the harness lies along the dog’s back.
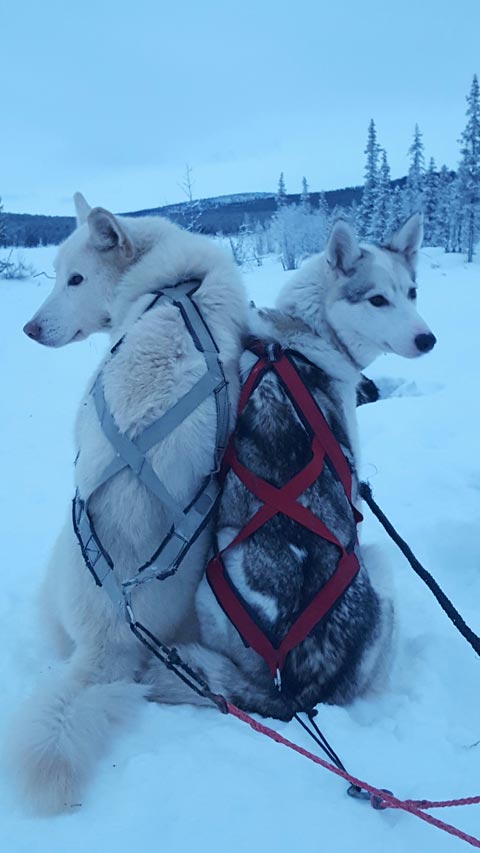
Take care when putting on the harnesses that you don’t leave the dog’s collar caught underneath – pull the collar forward so that it sits free of the harness.
Each harness has a small plastic bar at the back which fits into a loop on the sled line. There are also short neck lines. These are normally metal wires with carabiner or dog-lead style clips. The neck lines attach to a metal ring on the dog’s collar. They keep the dog facing forward and close to the central line.
Eager to get going:
The start of a day’s dog sledding, particularly on the first day when the dogs are really eager to get going, can seem quite chaotic and overwhelming.
The dogs will be extremely excited and the noise can be deafening. There will be lots of barking and the dogs may be straining at the their harnesses to get going. With all the adrenaline, the odd squabble may even break out between adjacent dogs.
This is completely normal – as soon as you start off, the noise will cease instantly!
It’s common that, in their excitement, the dogs may jump over the central line to the other side. This can happen before you start off or during sledding. In most cases, they will soon sort themselves out and jump back again. But be on the lookout for tangles, both before you start off and when sledding.
If a serious tangle occurs when sledding, especially if this is trapping or causing any discomfort to a dog:
- stop your sled
- anchor it securely
- untangle your team calmly before continuing
Starting off:
When all the dog teams are harnessed, all participants will stand on their sleds. Wait for the signal from the guide or kennel staff to start off. The guide will start first, followed one by one in order by the guest sleds.
Don’t release your rope/take up your anchor/take your foot off the brake until it is the right time to do so. Let the sled in front get going first.
Bear in mind the dogs will be pulling very hard at this point wanting to get going, and once you give them the chance, they’ll be off!
Start slowly and use your brake to keep everything under control.
Keep your distance:
When sledding, maintain a distance of at least a few metres from the sled in front. You will then have plenty of time to brake if necessary. Never try to overtake another sled. Your guide may recommend for various reasons that you change order in the line through the tour. Until requested to change, always stay in position.
The sleds in a group will naturally move at different speeds, depending on factors such as:
- weight of participants
- weight carried in the sled
- the particular dogs in the team
- how much the musher is using the brake
If the sled in front goes more slowly than you, you will need to brake more.
Look over your shoulder regularly to check the sled behind. If they have stopped because of a problem, call to the sled in front to let them know. Stop yourself until the sled behind catches up.
If you find that you are constantly going faster than the sled behind you and opening up a large gap:
- slow down
- keep the gap to a sensible distance
Sorting out difficulties:
It is important that the group does not spread out too far. Your guide will also be keeping an eye on the line of sleds, but depending on terrain and visibility conditions, it is often not possible to see all the way to the back.
You have a responsibility not only to yourself and your own dog team, but to other participants in the group. You should all work together to keep an eye on each other and assist with any problems.
If you do encounter minor difficulties when sledding, such as tangled lines, you will normally need to manage these yourself. Depending on the terrain in which you are sledding, it may often not be possible for your guide or another member of the group to come to your assistance. Work calmly to sort out the problem and then continue.
Unless the group as a whole is taking a break of course, only stop when really necessary. Don’t hold up the group by constantly stopping to take off or put on a layer of clothing or to take a picture. This can make it very difficult for the group as a whole to make progress.
Don’t shout “Mush! Mush!”:
It’s tempting in the excitement of a dog sledding tour to want to give commands to your dogs. But these have no real purpose.
Don’t shout “mush”, and don’t try to use verbal commands to get your team to turn left or right. Sled dogs are trained to follow the sled in front of them and will normally do so regardless of any commands given by you!
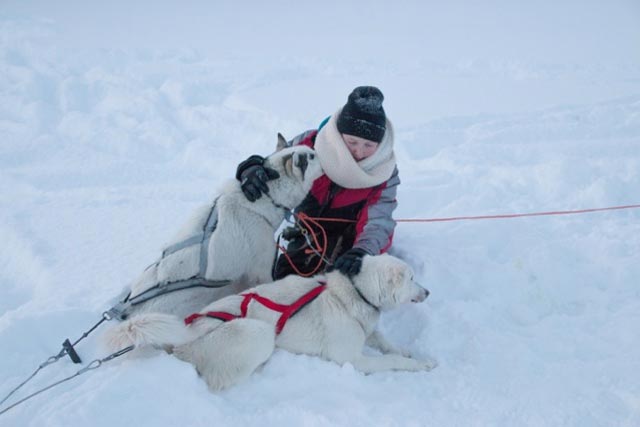
Friendly encouragement to your team (“well done”, “good dog Jasper”) is of course welcome – the dogs thrive on affection and praise – but don’t try to make your team go faster. Huskies are living creatures. Like us, they have their own personalities, feelings and emotions. Like us, they will have days when they feel more or less energetic.
Respect your team:
The dogs are not machines – they deserve our kindness, respect and gratitude. They will be doing their very best for you and will in turn expect that you do your very best for them (see “Helping your team” below).
A simple “Let’s go!” when starting off or “Whoa!” when stopping can be helpful, but in general, the dogs will naturally pull forward as soon as they feel the resistance from behind lessen (for example when you take your foot off the brake). They will naturally slow down against the pull of the brake when they feel the extra tension in the lines.
The guide, sledding at the front, will have lead dogs able to run without a sled to follow and trained to respond to commands for left and right. These vary, but are traditionally “gee” for right and “haw” for left.
You may also hear your guide give their team other commands such as “line out”, which instructs the lead dogs to pull the team straight out in front of the sled.
Don’t let go!
With the caveat of course that you should avoid any actions which may result in injury, as far as possible, if you fall over, do not let go of your sled! Hang on if you can, even if you’re being dragged along behind for a while until you can get to your feet.
Relieved of the weight of the person behind, a sled is very much lighter, and the dogs will keep running regardless of whether you are on the sled or not! They can run much faster without you on the back!
Losing your team can have serious consequences, both for the safety of the dogs and for the logistical operation of the tour. For example, it may cause a long delay while the team is retrieved. This can be especially important in the mountains, where there may be no tracks or forests to guide the direction the dogs will take.
Unless the team can be caught by your guide or another member of the group as it comes past, it is almost impossible to catch, by sled, a dog team running with an empty sled. The dogs may run a great distance and continue for hours pulling the sled behind them. They may become lost or entangled and sustaining serious injury before they can be found.
That said, while it is very important to be aware of this very real possibility, such dramas are rare. By exercising sensible caution and keeping control of your sled, you will keep both yourself and your dogs safe.
How to brake the sled:
There are two ways to slow your dogsled, both controlled with your feet:
• The main brake is a metal bar with teeth, operated with one foot and set on springs so that it automatically lifts back up when you take your foot off.
• The dragmat is a soft rubber plate which normally lies out of the way vertically against the back of the sled. It can can be lowered to skim along the surface of the snow and increase friction.
Using the main brake:
To operate the main brake, keep one foot on a sled runner, step on the footbrake with the other foot and the sled will slow. Greater pressure/greater bodyweight put on the brake digs the brake spikes deeper into the snow for extra braking power.
This is the main way in which you will slow down and stop the sled and is particularly important when sledding downhill.
You should always aim to keep some tension in the sled lines and not allow them to go slack, most importantly when going downhill. Then it is vital for the safety of the dogs that you do not let the sled run ahead and get too close to the dogs. A sled can very quickly pick up speed downhill and run over the wheel dogs, causing serious or even fatal injury to them.
Effective braking:
How effective braking is will depend on trail and snow conditions. In very deep, soft snow, the brake can sometimes have limited effect and the sled will still move through the snow quite easily. You may need to apply additional force and put your full bodyweight on the brake.
Similarly, in very icy conditions there is very little for the brake spikes to dig into. Then the spikes will bounce along the surface.
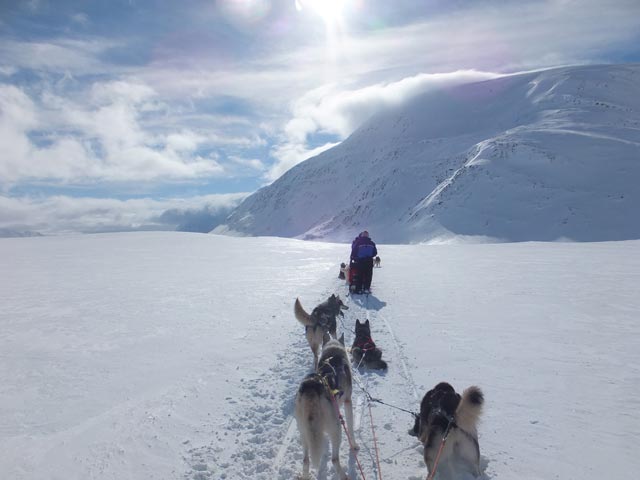
When sledding on rocky terrain or where there is very thin snow cover, the brake can catch suddenly on protruding stones or tree roots. This can damage the sled and also cause jarring and potentially an accident, so use the brake with caution. This may happen, for example, in exposed areas on a mountain dogsled tour, where the wind has blown the snow away at the top of a hill.
The best advice is not to let the sled build up too much speed in the first place. Then only moderate braking should be required at any time. A dogsled tour is not a race. The safety of both yourself and your dog team is paramount.
Using the dragmat:
The dragmat will slow the sled only a little. It is raised and lowered with your hand or foot while moving and stays in position until reset. If you don’t stand on the dragmat, it will skim along on top of the snow and create only minimal friction. If you put weight onto the dragmat with one foot, it will help to slow the forward motion of the sled, but will not normally be able to stop the sled completely.
The dragmat is therefore useful for “fine tuning” your speed or providing additional stability. But it is not a replacement for the main brake. In deep or soft snow, it can quickly collect a large heap of snow as the sled moves along. This increases the friction. You may find you want to have the dragmat down for a few minutes at a time on certain terrain, but will probably use it relatively little during your tour compared to the main brake.
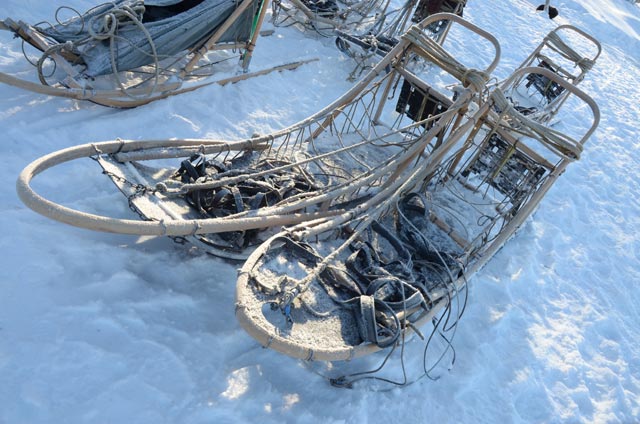
The anchor:
Your sled will also have an anchor, which is a metal weight with curved, sharp spikes attached to the body of the sled by a rope.
As the name suggests, this is used to secure the sled when at rest. Never use or handle the anchor when the sled is moving! The anchor is a potentially dangerous object. It can easily cause injury and must be stowed securely. It is normally hung over the back of the sled with the spikes safely out of the way when sledding.
When you stop for any extended period, whether or not you are leaving the sled, keep your foot firmly on the footbrake. Keep hold of the sled with one hand. Put the anchor securely into the snow, making sure the rope is taught.
Securing the anchor:
Kick the anchor down and forward into the snow with the curved spikes facing in the direction of travel. Again, how securely the sled can be anchored in this way will depend on snow and trail conditions. Be aware that in icy conditions or with very soft/deep snow, the anchor may not be that secure. The strength of the dogs can easily pull the anchor out.
If sledding in the forest and stopping for a longer period such as lunch break, your guide may recommend that you also tie the sled off to a tree. This is done with a quick-release knot which your guide will show you and gives additional security.
Some guides, again also depending on terrain, may recommend that you tip the sled over onto its side when stopping for longer periods. This of course makes it much more difficult for the dogs to move the sled. Check with your guide whether they consider this appropriate for your tour.
Helping your dogsled team:
It’s a common misconception that dog sledding is all about standing on the back of the sled while the dogs do all the work – it’s not!
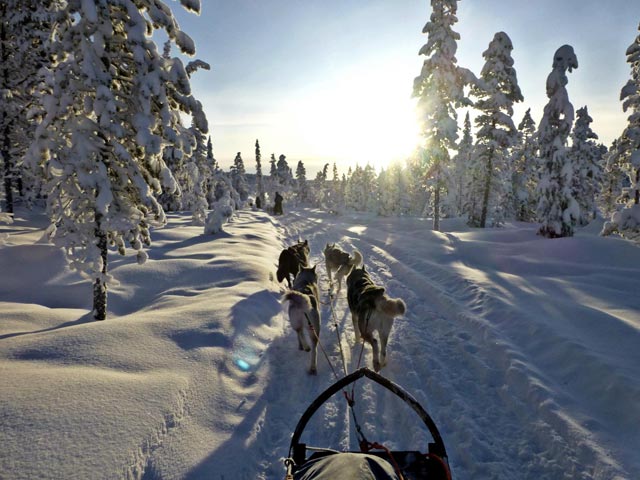
If course, when sledding on level terrain in good trail conditions, it’s often the case that you may be standing on the runners for extended periods. Sometimes, you may need to do little if anything to help your team along.
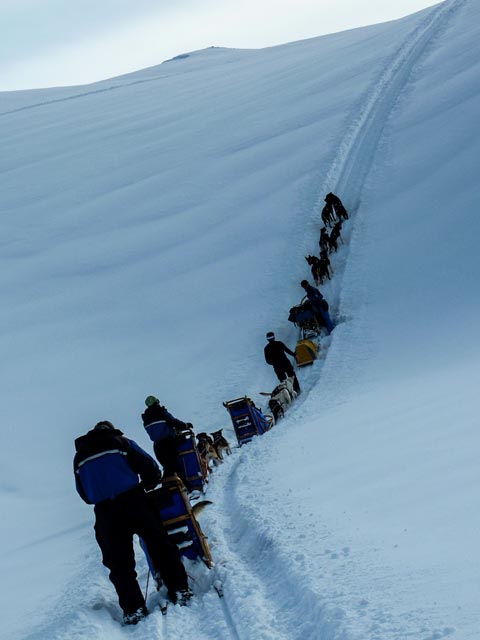
Going uphill:
But when going uphill, or even when sledding on the flat in challenging conditions, you will certainly need to work! This may be, for example, when crossing a frozen lake where water has risen above the ice. This makes the snow very heavy and slushy.
“Helping your team” may include:
- simply “scooting” along with one foot
- stepping off the sled completely to push from the back and help the sled uphill
- if completely stuck, coming to the front and pulling the sled out of a snowbank, up a hill, or through a patch of deep snow
You may be sinking up to your thighs in deep snow at the same time as you try to help your team, which quickly saps your energy!
Pull your weight!
The dogs will soon notice, and will soon let you know, if they don’t think you are doing your bit to help! They may stop completely if they feel it’s too hard until you help them. They’ll turn a head over their shoulders to give you a “Hey lazy bones, stop slacking and give us a hand here” look!
Dog sledding is a cooperative effort between you and your dog team. The more you help your team and work with them, the more your relationship with the dogs will grow and the more rewarding your dogsled adventure will be.
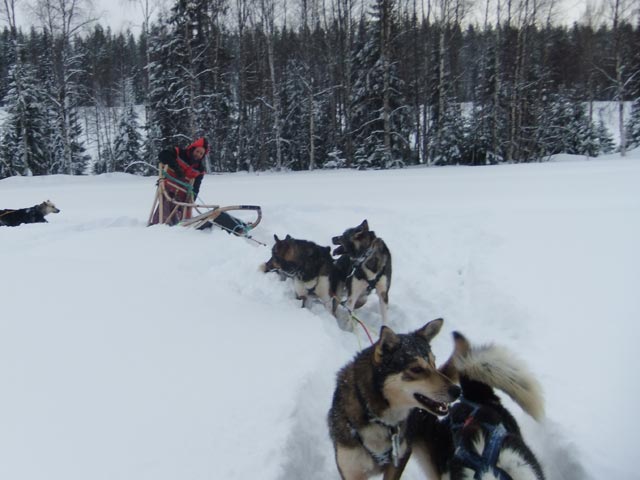
Cornering:
Going round corners, especially on narrow trails through forest terrain where you’re steering round a tree, can be tricky.
It’s important of course not to take a corner too fast and lose control. But don’t brake too much going into a corner! The dogs will keep running straight but the sled will naturally move in towards the inside of the corner.
You risk hitting a tree with the front of the sled. The sudden jarring could injure yourself or your dog team and/or damage the sled. Even if you don’t hit the tree, you may scrape along the side of it and catch your hand or face on a branch.
Approach the corner at a moderate speed so that you don’t need to brake going into it and can allow the sled to follow the curve of the corner naturally.
Using your weight:
When traversing a hill, sledding on a track with a camber, or just for general fine tuning, you will often want to adjust your weight from side to side. At times it may be helpful to step across to one side of the sled. You then have both feet on the same runner (the runner on the uphill side) to help keep the sled moving straight ahead. Watch your balance!
Taking pictures:
Dog sledding is of course a very photogenic activity, and most people will see taking photos during their tour as a great part of the enjoyment of their trip.

However, it’s important to think carefully when using your camera on a tour. It’s of course no problem to take pictures when you’re off the sled, but be very careful if taking photos when on the sled. Of course, any important tasks such as taking care of the sleds or your dogs must take priority and be done first.
Your guide may request that guests do not take photos at all when moving on the sleds. If photo taking is permitted, cameras should be used with caution:
- Keep hold of the sled with at least one hand at all times when moving.
- Don’t allow yourself to be distracted by your desire to get the perfect photo. Keep an eye on what is happening with your sled or dog team or with the sleds in front of/behind you.
- Only use your camera when moving slowly on flat terrain with no obstacles ahead.
- It can be very easy to drop items such as gloves (or even the camera itself) when trying to take photos. If you drop something, it’s very likely that it will be lost permanently. This is almost certain if there is no sled behind you to pick it up as they pass. In many cases, it will not be possible to leave your sled to go back and retrieve something you drop. You will have to continue the tour without it. If this is a costly item of included clothing such as a winter glove, you may incur a cost to replace it.
- In very cold conditions, removing your gloves regularly to use your camera or phone can have serious consequences. See our blog article on avoiding frostbite.
Now you’re ready!
We hope that you’re now feeling a little better prepared for your dogsled adventure!
We offer a wide range of tours of varying duration and level of challenge. Choose a family-friendly trip or challenging wilderness expedition! Browse our full range of dogsled tours in Sweden, Finland and Norway and don’t hesitate to ask us if you have any questions!